SBPL

SBPL
The Best Deal in Town!
Showing posts with label Book reviews. Show all posts

Friday, March 28, 2014

Milk and Cookies, Twitter and Bacon

Just as I was getting ready to teach my Twitter class* here at the Library, I saw this and laughed: "Bacon: the duct tape of food," tweeted by chef Michael Symon.  So true.  It's the all purpose fix-up for food that needs a little help.

Amazing when used well, but often overused, sometimes overpowering all else with its smoky salty flavor.  I admit that I have fallen under the spell of this seemingly magical ingredient and used it in some delicious preparations.  To wit:  bacon butter and bacon maple biscuits.  One bacon addition which I disliked:  Bacon Cookies from gourmet cookie shop The Milk and Cookies Bakery in the West Village of New York City.


Download this e-book from our Library website!
However, way over on the plus side for me were the Chocolate Chip Cookies from the very same Milk and Cookies Bakery.  They absolutely do not need bacon to be delicious. They are memorable and perfect just the way they are. In fact, I booked my family on a food tour of Greenwich Village on the basis of my foodie hair stylist Stacy rhapsodizing about those cookies. (Our tasting tour completely confirmed their wonderfulness.)

Best of all in my opinion is you can make these cookies anytime yourself using the Milk and Cookies bakery cookbook. We have it available at our Library as an electronic book.  (Just use your library card, then you can read it in your browser, or download it to your computer,  e-reader or mobile device.  Call us at 732-329-4000 ext. 7286 if you need help. Choose Libraries of Middlesex Automation Consortium as your lending library from the drop down menu.)
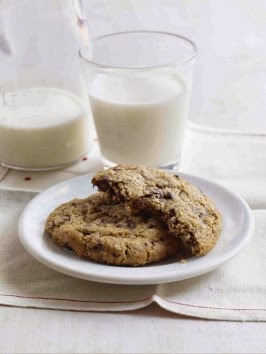
Photo from the The Milk and Cookies Bakery
Back to those Chocolate Chip Cookies - 1. They have an amazing crunch due to the addition of oatmeal that's ground up and mixed into the batter.  2. They have great depth of chocolate flavor from two kinds of chocolate: bittersweet chocolate flakes (make these in your food processor or blender) which are streaked into the batter, and large semisweet chocolate chunks (not wimpy chocolate chips).  And 3. They have both a  crunchy exterior and a soft middle.

Result - cookie nirvana.  Cookies even a bakery would be proud of. Or as my friend Barb said:  "You should sell these!".

I'll let you in on a few secrets:  these cookies require a little attention to detail, but it's totally worth it.  The first time I made them I brought them in to the Library and they were pretty good - see items 1. and 2. above.  But the texture, well, it was not quite right - the cookies were too big and too crunchy.
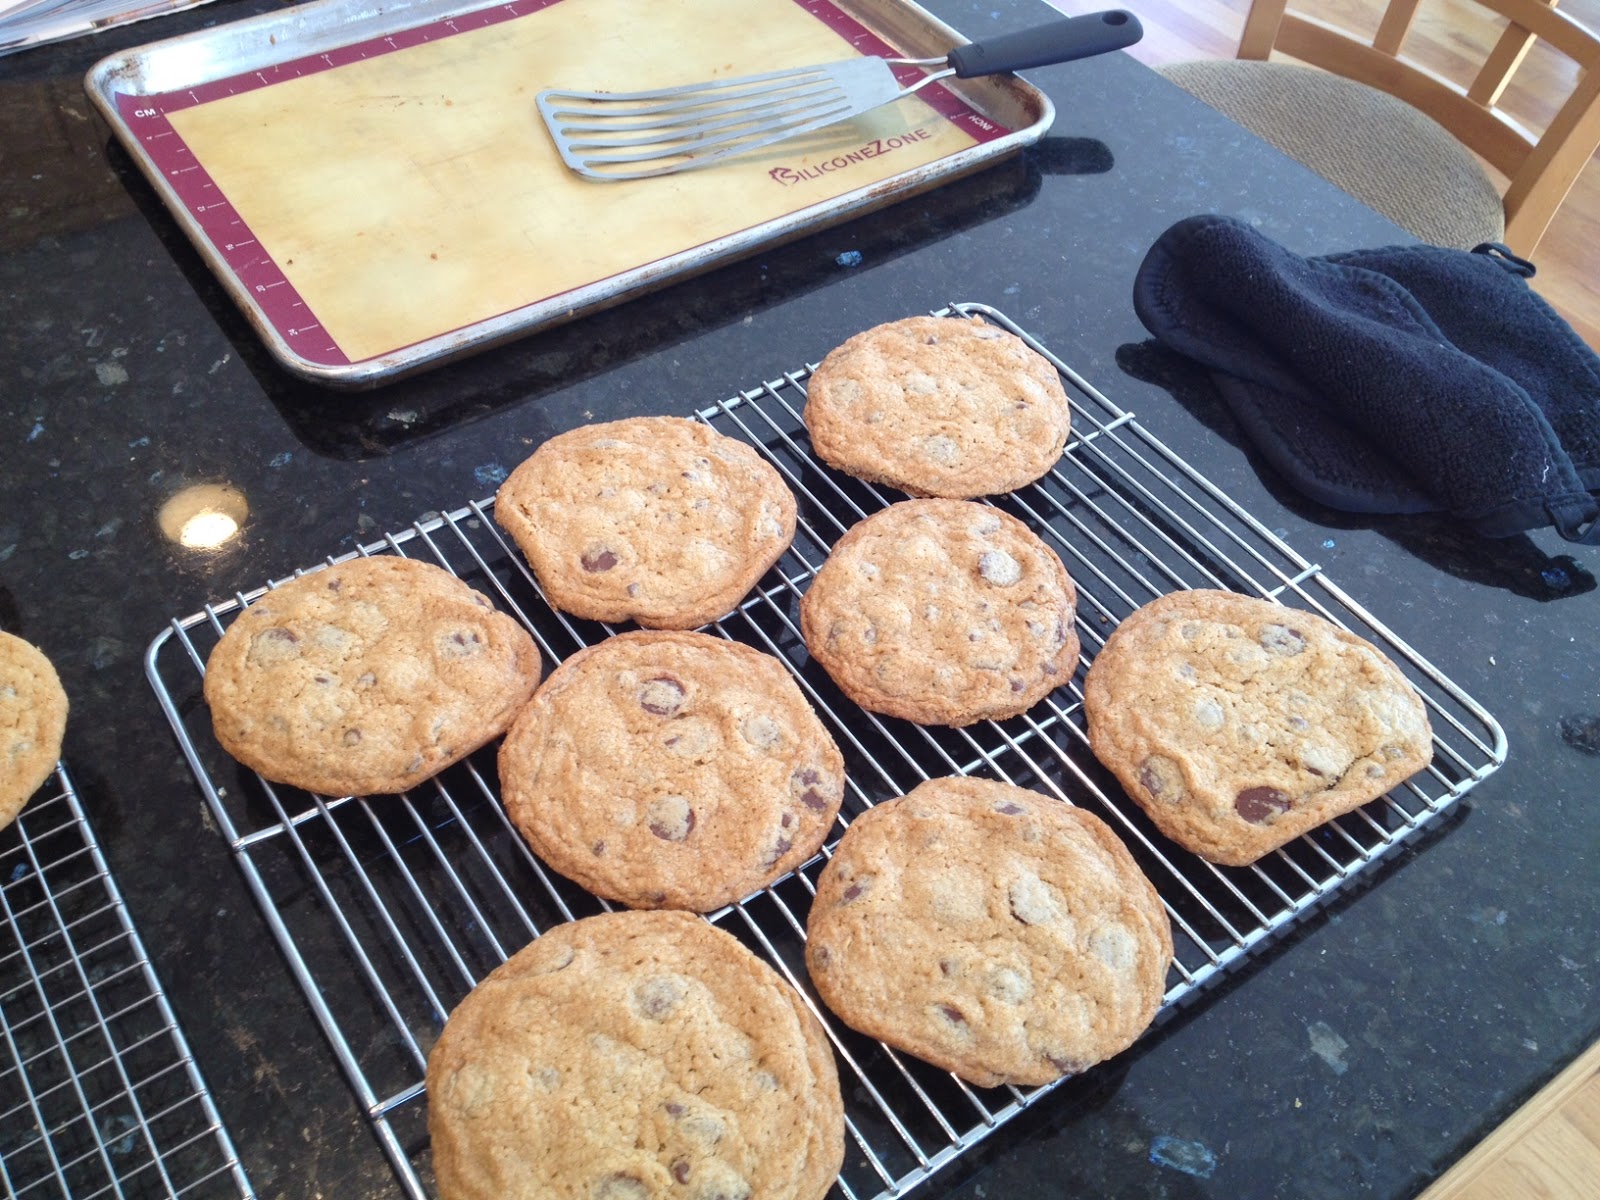
First attempt:  too big, too flat, too crunchy.
Second attempt:  gone before I remembered to take a picture. But totally like the first photo above.
I was determined to make them taste as great as the ones we'd had at the Bakery, especially since now both my daughter Kate and Stacy had raved about them, and I wanted to surprise my daughter with them for her birthday.

The second time I made them was a couple days later and I changed three things:  I shaped them into 2 inch (not 2.5 inch) hockey-puck-shaped rounds and then, before I baked them, I chilled the shaped rounds on the cookie sheets in the refrigerator for about 30 minutes, and finally, I was careful to take them out of the oven when they were firm on the outside but still soft in the middle.

We had them as dessert after Sunday dinner, and then I gave the rest to Kate to take home for a belated birthday treat (make that really belated - her birthday was in June!)  I asked her to share some with Stacy who consequently texted:

Stacy:  I LOVE YOUR MOM!
Kate:  They pretty much taste just like the cookies haha.
Stacy:  "They taste EXACTLY LIKE THEM!".

So here you go, click here for the link for the Milk and Cookies  Chocolate Chip Cookie recipe, and just be sure to follow the caveats above.  And please don't add bacon.

Diane Whitman
@whitlibrarian
Reference Librarian
Persistent Baker

P.S.  I read some of the comments for this recipe so there's one more thing to be sure to do:  when you cream the butter and sugar, be sure to use a standing type mixer (like a KitchenAid), not a hand held mixer, and when the recipe says "beat until very light and creamy", this means to be sure and beat it for 5 - 6 minutes until the color changes to very pale yellow and the mixture is noticeably light and fluffy!

* Check the Event Calendar for the next Twitter class, scheduled for early May 2014.

Friday, February 7, 2014

Sweet Indulgence: Liddabit Sweets Hip-to-be Squares

Cornflakes for breakfast?   Not exactly: the other morning I could be found at my kitchen island crushing (not eating) cupfuls of cornflakes and combining them with Guittard milk chocolate and, yes, half a jar of Nutella. After spreading this delectable mixture in an 8 x 8 inch pan and popping it in the fridge for an hour, and coating the resulting bars top and botton with Ghirardelli dark chocolate:  Voila -  Hip-to-be-Squares a la the Liddabit Sweets Candy Cookbook.


Written with wry good humor by Brooklynites Liz Gutman and Jen King,  the Liddabit Sweets Candy Cookbook is the ultimate confection cookbook for someone like me who loves the thrill of making something sweet, delicious and at times, kind of challenging.

The recipe for Hip-to-be Squares appears simple, and if you decide not to temper the chocolate, it really would be.  But I have made chocolate candies before without tempering and the resulting chocolates inevitably are not the lovely, glossy showpieces I was hoping for, but chocolates that were dull and definitely not professional looking.  Liz and Jen and the Liddabit Sweets Cookbook to the rescue!

Not wanting to go the easy route, I skipped over the instructions for "Cheater's Chocolate Coating " and went directly to the "The Best-Tempered Chocolate You Ever Met" instructions.  Last Christmas I had asked for this cookbook and a chocolate thermometer to go with it so that I could do justice to these recipes.   It's over a year later and I finally got around to making one of the recipes, but for the life of me I could not find that thermometer.

No matter, there were instructions in the book for judging the temperature of the chocolate by putting a drop on your lip and deciding whether it was distinctly warm or distinctly cool.  So I went ahead without the doggone thermometer.

That worked just fine, the filling itself was easy first of all, and the tempering was fun, albeit a little time consuming.  I confess I did have to improvise a little because I cooled the chocolate down too far and needed to slightly re-heat it to make it spreadable.

Sidebar:  tempering chocolate is taking bars or discs of chocolate (which already are in temper and shiny) and heating the chocolate to a specific temperature (dark chocolate to 108 degrees) and then cooling it down to another specific temperature (90 degrees) all the while beating it like crazy to aerate and cool it before using it in your recipe.  The resulting chocolate should have snap and shine without any whitish "bloom" or chalkiness.

Forthwith, a photo of the completed chocolates, not absolutely perfect, but pretty good looking, and certainly mighty tasty.


I halved the recipe because the cost of good chocolate can be prohibitive, and I want to try some of the other chocolate recipes from this cookbook too!  Also, this recipe as originally written makes a giant batch: 117 one inch chocolates from a 13 x 9 pan.  I think it's entirely enough to make 64 one-inch chocolates in an 8 x 8 pan.

I've included tips along with the adapted recipe to make it easier for y'all.

Hip-to-be Squares, halved and adapted from the Liddabit Sweets Candy Cookbook

Yield:  64 one-inch square chocolates

For the bars:
generous 3/4 cup of chopped milk or dark chocolate, or chocolate chips (I used Guittard milk chocolate - 5 ounces)
1 1/2 generous cups of Nutella (14.5 ounces)
3/4 teaspoon of kosher salt or fine sea salt (if only regular table salt is available, use 1/4 teaspoon) - you can double this to get that salty/sweet flavor so popular now - I did!
1/4 cup mild vegetable oil such as sunflower or safflower
1 cup crushed cornflakes (I crushed about 2 cups of flakes in my Vitamix to yield 1 cup crushed - a food processor works well too)

For the coating:
1 1/2 cups or 9.5 ounces chopped dark chocolate ( I used half  Ghirardelli 60% chocolate and half 72% chocolate)
(For Cheater's Chocolate add:  1/4 cup vegetable oil)

Line the bottom and 2 sides of an 8 x 8 inch baking pan with parchment paper.  Line with a second piece of parchment over the bottom and remaining 2 sides.


Melt the 3/4 cup of chopped chocolate in a large bowl in the microwave (zap in 20 second increments, stirring in between).

[Alternate method: add water to about an inch depth to a medium saucepan, and bring to a simmer.  Place a large metal bowl over a medium saucepan filled to a depth of about an inch with simmering water.  Stir frequently until all the chocolate has melted. Remove from heat.]

Add the Nutella to the melted chocolate and stir until blended.  Add the salt, oil, and crushed cornflakes, stirring again until well blended.  Turn into the parchment paper lined pan, smoothing the top.  Refrigerate for 60 to 90 minutes, until firm.


Melt and temper your dark chocolate.  For full directions for tempering chocolate with a thermometer:  click here (if you don't have a thermometer, just use the "lip test" described above).

[Alternate: for cheater's chocolate:  melt the chocolate over simmering water or in the microwave.  Off heat, gradually beat in the oil.  Let cool for 15 to 20 minutes until about the thickness of warm hot fudge.

Turn out the the candy onto a parchment lined cutting board and remove the parchment.  Coat the bottom of the bars with about 1/4 to 1/2 cup of the melted chocolate, spreading with an offset spatula if you have one (or just use a knife).  Let set up - anywhere from 2 to 5 minutes. Turn right side up.  Coat the other side with the rest of the chocolate.  Let set only about 1 minute, and quickly, using the tines of a fork, make wavy lines in the chocolate before it sets completely.


Let set again about 2 minutes.  Then score just the top layer of chocolate into 1 inch squares.  Let set another 5 minutes, and then cut through the candy completely into 1 inch squares.  Be sure to cut through completely to the bottom layer of chocolate in order to get neat squares.

Store in an airtight container at cool room temperature for up to 3 weeks (doubt they will last that long!).


Good luck, be sure to share, and get cooking with some great cookbooks from our Library!

Diane Whitman
@whitlibrarian
Reference Librarian

Friday, August 2, 2013

Zucchinis and Twitter

Zucchinis and Twitter

It's that time of year again when good looking zucchinis are in every New Jersey market, and you can't help buying them because they look so fresh and healthful.  If you have a garden you probably have been resorting to dropping zucchinis off at neighbors houses. (Ringing the front door bell and running? -  well, maybe not that bad.)

In any case, here's a yummy way to not only use up but to enjoy zucchinis (and/or any kind of summer squash) in a versatile and delicious preparation:  Zucchini Butter.

(from Food 52's website)
Zucchini Butter is perfect warm and unctuous slathered on bruschetta, as a dip for crackers, carrot sticks or even zucchini sticks.  Or you can just do what my friend Carol did and simply eat this out of the bowl.  She proclaimed this "the best zucchini I ever ate", and my friend Barb texted me the next day for the recipe to make for her weekend guests.

This comes from the website Food 52, which I initially found because it sponsors and publishes an awesome competition for the best cookbooks of the year, but which I keep in my Twitter feed because it showcases some of the best food trends and recipes out there.  (www.food52.com, @food52 on Twitter)

Did I mention that Zucchini Butter is easy, cheap, and would keep well in the fridge for a day or two if all of it is not eaten immediately?

Yep, you should buy some zucchinis right now and have this tonight.  Disclaimer -  this may have been fantastically delicious because of the great quality of the ingredients I used:  fresh from the farm zucchinis and onion, flaky Maldon sea salt, black pepper imported by a friend from India, and olive oil purchased from Natirar Restaurant which they import themselves from Tuscany.  Which all goes to prove that sometimes great cooking is really just great shopping.

But don't despair if you don't have these same exact ingredients - the silky smooth "buttery" texture that the zucchini takes on from cooking down and having its flavors concentrated will still be present and wonderful; if not that elusive sweetness and freshness that you get from cooking with just picked ingredients.


Jennie Cook's Zucchini Butter adapted from Food 52's Twitter Feed, from July 24, Kristen Miglore

1/4 cup good tasting extra virgin olive oil
1 small white onion (OR 2 shallots, OR 3 large cloves of garlic - in fact, anything from the allium family, to give that onion-y flavor)
Sea salt, if you have it, kosher or regular salt if you don't
Freshly cracked black pepper
3 or 4 medium zucchini (1.5 to 2 lbs.), grated to make anywhere from 6 to 8 cups (can mix in yellow summer squash too!)

Saute the onion (or shallots), sprinkled with salt and pepper, in the olive oil in a large skillet on medium low heat for 5 or 10 minutes until softened and translucent.  (If using garlic, cook only for 30 - 60 seconds.)

In the meantime, squeeze out handfuls of the zucchini to rid the squash of excess water, and then add all the wrung out grated zucchini to the skillet.  Add more salt, turn up the heat to medium high, and cook, stirring occasionally, for 15 minutes.  It's ok if the zucchini browns here and there, it will just add to the flavor.

Serve warm, or gently reheat if used later.  Yields about 2 cups.


Enjoy the bounty of the Garden State in summer!  And sign up for my All About Twitter class at the Library on Friday, September 27 from 12 - 1 to learn how to get connected.

Diane Whitman
@whitlibrarian
Reference Librarian
Jersey Girl/ Tweeter


Thursday, July 11, 2013

It's (truly) All Good


It’s  (truly)  All Good

I’ve been trying to find cookbooks that support the bounty of fresh, organic produce I’ve been getting from my CSA, Dogwood Farms (read – use up before it overtakes my fridge.)  Here are several I picked up at the Library.

The first one that caught my eye was appropriately called The Farm by Ian Knauer.  This one had lots of recipes for seasonal produce but what really stood out to me in this cookbook were the number of recipes that included bacon!  Truth be told,  I like bacon as well as the next person, but lately it has been so overused that chef Michael Symon recently tweeted:  “Bacon:  the duct tape of food.”  It’s almost like cheating – add bacon, and everything tastes great!

Besides the bacon, many of these recipes called for more cheese, meat and fat than I was comfortable with.  I was looking for recipes that were fresh and healthful, not just good tasting, and where the produce itself takes center stage.  Next.

Another promising candidate was Vegetable Literacy by Deborah Madison.  Here was a book that read almost like a primer for the professional cook.   In fact, its subtitle is “Cooking and Gardening with Twelve Families from the Edible Plant Kingdom with Over 300 Deliciously Simple Recipes.”  Each chapter contained its own little lesson about the growth habit of the vegetable, who its botanical cousins were and what flavors paired well with it.  The recipes were interesting but were often of the side dish variety, again, not quite what I was looking for. (I am soooo picky.)

Enter Gwyneth Paltrow’s new offering It’s All Good, and its recipes are exactly what I want to be making this summer.  Yes, it veers off into the realm of fervent veganism, as well as being gluten free, but you can look at this in two ways:  it might expand your culinary horizons, OR, you could just re-adapt the recipes back so that you use flour with gluten, regular sugars, add meats and cheeses, whatever, if you like.  (Cheating?  Well, nobody's perfect!  Except maybe Gwyneth...)

One thing I loved about this book is that the salad dressings are all phenomenal, plus they're different enough from one another that you could vary the salad ingredients and enjoy lots of different tastes to keep you happy all season.

If you are looking for a healthful, fresh way to cook that is also gourmet delicious, and truly easy, It's All Good is your book.  Great example, this refreshing peach basil summer smoothie combination that I bet you haven’t had before.  Wonderful for breakfast, I poured out two glasses full, but after one taste, I decided not to share and drank them both!  (Full disclosure:  I did make another batch for my husband, but it wasn’t quite as good, as the peach wasn’t as sweet and ripe.  So if you don’t have a giant luscious peach like I did, use two smaller ones, and decrease the lime to ½ a lime if they’re not dead ripe and sweet.)


Crazy Delicious Peach/Cucumber/Basil Lime Smoothie

1 large ripe peach, pitted, not peeled
1 cucumber, peeled
1/3 cup of fresh basil
1 lime, peel and pith removed
1 cup or so ice cubes

Coarsely chop up the first four ingredients, and add them to your blender in order.  Add  ice cubes.  Blend away.  Be amazed.


(If I hadn’t scarfed down the whole thing immediately, the glasses would have looked so pretty decorated with a peach slice and a basil leaf…!)

Can’t wait to see what I get this week from the farm!

Diane Whitman
@whitlibrarian
Gwyneth Fan

If you want to see what a CSA is about, check out their website:  dogwoodfarmsnj.com.

Friday, June 28, 2013

Sea Salt Magic

Sea salt caramel whipped cream...doesn’t that description make you want to go right out and eat some NOW?  (Me? Guilty!) The addition of salt - specifically large, flaky sea salt, totally elevates the flavor of the caramel whipped cream to something so beyond delicious, it's almost magical.

In our Library now!  Come in and check it out.

We're all familiar with the great combo of cake/berries/whipped cream which is strawberry shortcake, but  Caramel Fleur de Sel Whipped Cream takes this dessert to another level entirely - and guess what? It's easy, people!

Cheat and make this today with a yellow cake mix and it will be (almost) as good.  Make this now with strawberries and yellow cake, in July with blueberries and chocolate cake (love that), and in August with peaches, raspberries and white cake with a little addition of almond extract...(yum, can't wait for peaches - I love summer!).

Go for the strawberry version and scatter in some blueberries to make it colorfully Fourth of July festive.


This recipe hails from the fun book Relish by Daphne Oz from the daytime food talk show “The Chew”. Though not technically a cook book, more a lifestyle book, this recipe is a keeper.

I've changed up the directions so that each person adds salt on top of their own serving to taste: some may prefer more or less (and children none at all). Use Maldon sea salt or French fleur de sel if any way possible - it makes all the difference. (Am I being a salt snob? Yes, I admit it, but it really does...!)

(Notes: Caramel is simple, but can be tricky if you don’t watch it carefully once it starts to change color, so be vigilant. Also, sugar burns are intense – be careful not to get any on your skin.)

I couldn’t resist sharing this photo of our Strawberry Cake with Caramel Fleur de Sel Whipped Cream which my granddaughter frosted and decorated herself for my daughter’s birthday.
Devon's design.

Caramel Fleur de Sel Whipped Cream Frosting, adapted from Relish, by Daphne Oz

1/2 cup sugar

2 Tablespoons water

2 cups heavy cream, divided as follows: 3/4 cup heavy cream for the caramel, 1 1/4 cups for whipping

2 Tablespoons unsalted butter

1/8 teaspoon kosher salt

Maldon sea salt (or other large flake sea salt such as French Fleur de Sel) for sprinkling on each serving to taste
Cake
Berries

Mix the sugar and water in a heavy medium saucepan set over medium high heat. Stir until the sugar dissolves. Cook without stirring until the syrup turns medium amber, if you are using a candy thermometer, to about 355 or 360 degrees. Remove from heat and carefully whisk in 3/4 cup ONLY of the heavy cream, then the butter and kosher salt.

Pour the caramel into a small bowl and refrigerate (or freeze if you’re in a hurry – about 30 minutes) until cooled and thickened. (Can be prepared ahead to this point.)

Place the remaining cream in a large bowl and beat with an electric mixer until soft peaks form. Add the cooled caramel and beat until stiff. Decorate your cake with cream and berries. Have each person add salt to taste.

Be proclaimed the Wizard of Dessert Alchemy.

Diane Whitman
Twitter @whitlibrarian
Reference Librarian,
Powerless in the Face of Awesome Desserts


Friday, April 26, 2013

Wary of The 4-Hour Chef

Never having read The 4-Hour Workweek, but hearing that its author was somewhat out there, I picked up his latest tome, The 4-Hour Chef, with low expectations.  I started to read it through, and was hooked, skimming through the entire book, and putting it down only when I got to the last page.

Lots of cookbooks cover old ground, and it's rare that I find more than one or two bits of information that I haven't heard before.  During my quick read of The 4-Hour Chef, I found so many useful tips and techniques, that I ended up going back and combing  through it  carefully, looking for anything I may have missed.

The 4-Hour Chef  truly IS out there, in many ways.  Ferriss includes numerous detours and sidebars in what I would actually term a cookbook slash experiential memoir, of him  learning  to cook from very accomplished and famous chefs.

Take the entire "Wild" section for example.  Here you will find  info (beware - graphic photos!) on butchering rabbits, chickens, deer, squirrels  and various other animals.  These I skipped, (at my peril, I suppose, in case there is ever a nationwide disaster).

Another section called "Sci" explores molecular gastronomy, if by any chance you want to add to your cooking repertoire gels, foams, and powders after the techniques made famous by Ferran Adria, of elBulli in Spain.  (Not today, thank you.)

Not only that, but interspersed among  these esoteric wanderings are treatises on  how to learn a foreign language, what is the best survival gear, etc.  What?  But you'll also find great recipes from master chefs and eminently  usable and valuable information.  For example, there are informative sections on educating your palate, practicing knife skills, and purchasing good kitchen equipment.

Rosemary cookies al fresco.

My first foray into these recipes was trying the Rosemary Pistachio Cookies from the Science section.  I must say, people really liked these.  They were similar to brown sugar chocolate chip cookies,  but with the chocolate exchanged for white chocolate, the walnuts for pistachios, and fresh rosemary added for a subtle and delicious nuance.

There is no way I would call Ferris' writing subtle.  Much of it is irreverent and colloquial, but undoubtably there is a great deal of accurate and useful information here. If you choose to follow  his "Dom" for Domestic section alone, you would, as advertised by the title, be well on your way to acquiring  a solid foundation for a lifetime of cooking without recipes.

Kokkari Shrimp, with added artichokes.

Recipes I tried and loved:  Kokkari Shrimp, Harissa Crab Cakes, and Coconut Cauliflower Mash with cashews.  Only the cookie recipe needed to be tweaked a little, adding 1 Tablespoon baking powder and 1/2 teaspoon salt to all-purpose flour instead of  using self-rising flour, because, after all, who HAS that?

Harissa Crab Cakes and Coconut Curry Cauliflower.

This is an altogether fun and valuable book, whose recipes, by the way,  follow the precepts which he espoused in The 4-Hour Body, (a book  I was compelled to pick up next, figuring that if Ferris had great  information about cooking, maybe he had some good ideas about being fit too: jury still out on that).  The 4-Hour Chef recipes are easy, emphasize good quality ingredients, and generally exclude white starches.  A bonus:  the recipes are sophisticated, but simple enough to require a minimal number of pots and pans which translates into easy clean-up.

Although Tim Ferris is most definitely a nut, he is a well researched, successful, rich and smart one too.  Try this recipe below as an alternative to rice or potatoes, or it's great on its own too.

Easy cauliflower prep tip.
The delicious result.


Coconut Cauliflower Curry Mash  adapted from Tim Ferris' The 4-Hour Chef

1 small head caulifower
1/4 cup roasted cashews
3/4 cup unsweetened coconut milk (such as Thai Kitchen)
1 teaspoon kosher salt
1/2 teaspoon curry powder
1/2 teaspoon cinnamon

Pull off all the green leaves from the cauliflower.  Center the stem on a tea towel, pull up the sides to cover the top, and hold it,  smashing the stem down on a cutting board.  All the florets will break off, leaving the stem.  (Is this a great technique or what?)  Cut up any larger florets, so that the pieces are of uniform size and will cook evenly.  Discard the stem.

Put the florets in a medium saucepan, adding the cashews and coconut milk.  Heat until boiling, then reduce to a simmer, covered, for 20 minutes or until tender.  Off heat, stir in the salt, curry and cinnamon.  Mash with a fork or a potato masher until of the desired consistency.


Diane Whitman
Reference Librarian
Learning Not to Make Snap Judgements (Sometimes)

Tuesday, April 23, 2013

Is #Asparagus Trending?

When I lived in Austria one year,  and worked as an au pair for a very rich (old money) family,  the only asparagus they ever ate was white.  Asparagus often appeared as a kind of edible decoration for a platter of lunchtime scrambled eggs, served poolside, surrounded by tomatoes, the tinned white asparagus, and buttered toast points.

Turns out, most of Europe prefers white asparagus; green is quite uncommon. At that time, it seemed to me that white asparagus was the height of elegance;  besides that, I loved the name in German too: Spargel, (pronounced spar'-gull) as though it were sparkling.

Back in the U.S., even green asparagus seemed like an upscale vegetable during the Mad Men era. It was served on special occasions,  usually with a decadent hollandaise sauce.

Nowadays, asparagus is an everyday vegetable, a welcome harbinger of springtime in the markets.


Lately there seems to be a trend for horizontally slicing all manner of raw, fresh vegetables into ribbons, including asparagus.  Zucchini sliced into ribbons can replace pasta, great for the gluten free or the health conscious (see my blog post: "Zucchinis Take Over the World" from 8/5/2011). I've seen trends for beets, turnips and kohlrabi sliced this way for roasted chips, a la kale chips, too.

In regards to trending, last week I taught a class in the Library about Twitter. Using Twitter is not only interesting and fun, it's vastly informative.  You can follow breaking news in real time, (I saw eyewitness' entire videos of the Boston Marathon bombing within hours). You can follow well known people you admire in any area at all of your interest (cooking! libraries! technology!). This can lead to all sorts of serendipitous discoveries and references.

When I tweeted about making Kokkari Prawns from Tim Ferriss' Four Hour Chef (great book, wonderful dish, by the way)  - he favorited my tweet.  My brush with celebrity!  I was thrilled.  I'm sure it was auto-generated, but still, it's fun.  My friend's daughter has even tweeted back and forth with famous chefs.

Here's an example of asparagus pizza from The Smitten Kitchen Cookbook by Deb Perelman:   ribbons of asparagus topping a homemade  pizza.


I made this one day when I wanted to try out all the great looking pizza dough variations in the Smitten cookbook.  Pros:  thought the greens topped pizza and regular pizza were very good, but what everyone really loved was the eggplant calzone.  It was a perfectly balanced temptation of eggplant, creamy cheese, and oozing mozzarella,  not too much of any one element.  LOVE.


Eggplant and Three Cheese Calzone adapted from the Smitten Kitchen

Prepare the dough, or purchase 3/4 pound of pizza dough:

1/2 cup warm water (between 110 and 116 degrees)
1 1/4 teaspoons active dry yeast (NOT rapid rise)
1 1/2 cups (190 grams) all-purpose flour or bread flour, plus more for kneading
1 teaspoon table salt
olive oil, to coat bowl

Warm oven to 200 for 5 minutes, then turn off.

Pour the warm water into the bowl of an electric mixer. Sprinkle the yeast over it and let stand 5 mins.  Add flour and salt; mix with a dough hook at medium speed until the dough just comes together.  Change to low speed and mix for 5 minutes until smooth and elastic (or mix by hand, and then knead).

Coat a mixing bowl with oil, drop in the dough, cover with plastic wrap and place in the warmed, but turned off, oven.  Let rise for 30 minutes, or until doubled in size.


Prepare the filling:

1 Tablespoon olive oil
1 medium eggplant (about 3/4 pound), sliced 1/4 to 1/2 inch thick
Salt
Freshly ground pepper
Pizza dough
1 cup ricotta (8 oz.)
1 cup mozzarella (4 oz.), coarsely grated
1/3 cup finely grated Parmesan
dried oregano
1 egg, beaten with 1 tsp. water
bit of fresh basil

1 cup tomato sauce

Preheat the oven to 425 degrees.  Cover a baking sheet with foil, spread with the olive oil.  Dredge the eggplant slices, on both sides, lightly in the oil.  Sprinkle with salt and pepper.  Roast 20 minutes, flip, roast another 10 minutes.  Remove from oven, but leave oven on.

Roll the dough out to a 12 inch circle.  Mix the cheeses together, season with 1/2 tsp. salt, and the pepper and oregano to taste. Fold in the eggplant, and mound it in the center of the round of dough.  Pull the sides of the dough up and over the center, crimping it to seal.

Brush the outside all over with the egg wash.

Bake for 15 to 20 minutes until deep golden brown (a pale crust will be less flavorful).  Serve with tomato sauce on the side, preferably with someone who loves good food!

I'll be teaching the next Twitter Basics class in June, so please sign up, come to the class, see what's trending, and maybe take out some great (cook) books while you're here.

Diane Whitman
Reference Librarian
Twitterer (Tweeter?)
@whitlibrarian


Friday, April 12, 2013

Back to The Smitten Kitchen

Last time I blogged about how I could not stop cooking from Deb Perelman's The Smitten Kitchen Cookbook  from our Library.  Here are more musings on my semi-maniacal recipe testing:

Love my cast iron skillet!
The other night as I was wondering what I could possibly make for dinner, I found some Yukon Gold potatoes and had the makings for Deb's Potato Frittatta with Feta and Scallions.  (See adapted recipe below.)  Together with the Iceberg Stack with Blue Cheese and Radishes, this made the perfect dinner before going out to watch some college hoops.  

My visiting daughter proclaimed it, "Everything delicious about a breakfast sandwich".  She then proceeded to make the exact same thing for her family the next night.  This recipe is definitely a keeper - tasty, easy, and economical. The salad is all that's good about an iceberg wedge salad, but instead Deb Perelman inventively cuts the head of lettuce into1 inch thick slices. The result:  a better distribution of the topping ingredients as well as a fun, lopsided look (like the stacking game 'Blockhead'?).

Not so photogenic, but tasty.
The next recipe that caught my eye was for a Marbled Pumpkin Gingersnap Tart, swirled prettily and baked in a gingersnap crust.  This recipe totally delivered the goods as far as taste goes, but I found that the pumpkin and cheesecake did not swirl together easily.  The relative weights of the two mixtures were too different to blend well. Nevertheless, the flavor combination of the pumpkin/cheesecake/gingersnaps was so enticing, and the preparation so easy, that I will definitely make this again.

Picture perfect.

And just because my son Andy loves them, I had to make the so-called Salted Brown Butter Crispy Treats, aka Rice Krispies Treats.  (OK, and also because I had a lot of leftover marshmallows from fall's bonfires.)  These Treats looked better than average as Deb advises using a smaller pan so each square is twice as thick as normal. She also doubles the (unsalted) butter, which she browns first, and adds sea salt, which translates into a nuttier, fresher, brighter flavor profile.  Nice.

Better with more lemon.
On a baking binge,  I saw the recipes for and knew I had to make the following :   Whole Lemon Bars - because it uses one lemon, including the skin!;  and  Gooey Cinnamon Bars - because I'd read other  recipes for "gooey" cakes but only wanted to try one from a trusted source.


No improvement necessary:  great recipe.

Verdict:  the Whole Lemon Bars:  very good, but not stop-you-in-your-tracks great. I made them again because I wanted a quick and easy lemon dessert, and liked them better with double the lemon and 1/3 the amount of butter.  On the other hand, the Gooey Cinnamon Bars  were terrific:  people's comments ranged from "these are soooo good" to "you could sell these!".  Loved them, and was really glad I took them to work.  Otherwise, I easily could have eaten a quarter of this cake myself!


Potato Frittata with Feta and Scallions adapted from The Smitten Kitchen

A+
2 Tablespoons olive oil
2 pounds Yukon Gold potatoes
Salt, plus 1/2 teaspoon for the egg mixture
Freshly ground black pepper
1/4 pound bacon, cut crosswise into 1/4 inch slices
3 or 4 scallions, trimmed and sliced thinly
2/3 cup crumbled feta
6 large eggs
2 tablespoons whole milk or cream

Preheat the oven to 400 degrees.
Line a rimmed baking sheet with heavy duty aluminum foil (no pan to wash!).  Peel potatoes, halve lengthwise, and cut into 1/4 inch thick slices.  Pile on sheet, drizzle with 2 tablespoons olive oil, season with  salt and pepper, and mix well.  Spread out on sheet and roast for 30 minutes, turning them over after 15 minutes.

Cook bacon until crispy in a 10 or 12 inch cast iron skillet or other oven proof skillet.  Scoop out the bacon. Add the cooked potatoes and oil to the bacon drippings in the skillet, and spread them out evenly.  Scatter the bacon, then scallions, then feta over the potatoes.

Whisk the eggs and milk together with 1/2 teaspoon salt and a few grinds of black pepper.  Carefully pour over the potato mixture in the skillet.  Cover with aluminum foil and bake for 20 minutes.  Remove foil, and bake for an additional 10 or 15 minutes, or until the eggs are set in the middle.

Serves about 6.

What can I say?  I love this cookbook, and have joined the legions of  The Smitten Kitchen's blog followers, who can't resist Deb Perelman's spot-on, inventive recipes.

Diane Whitman
Reference Librarian,
Compulsive Cook

Friday, March 8, 2013

The Smitten Kitchen Has My Number


The Smitten Kitchen Has My Number

When I leafed through The Smitten Kitchen cookbook at the Library, I knew that I had to start cooking from it - immediately.

Written by Deb Perelman, a home cook and blogger, The Smitten Kitchen presents each recipe with an alluring photograph and a chatty introduction.  The recipes ranged from renditions of the familiar and comforting to explorations of the sophisticated and unusual - .

Not only was Deb Perelman cooking all this great stuff, but she had a toddler at home too?  I thought, why aren’t I making these recipes?  It seemed like all the fun foods I had toyed with making, she not only had made, but perfected. 

Man, I was behind!  I had to get cooking.  So I did.  And once I tried one recipe, I couldn’t stop – I was obsessed with this cookbook.
Take out the center green part of the garlic clove to prevent bitterness in the final dish.
Beautiful Swiss chard.

The first thing I made from what I had on hand was individual Pancetta, White Bean and Swiss Chard Pot Pies.  Since I was bringing this over to a friend’s, and wouldn't have use of an oven, I only made the “stew” inside.  Quite delicious, a good start, Deb, but the pastry crust was really the showstopper here, and I’d seen individual pot pies like this before.  What else ya got?
(Sorry - did not have fresh parsley, should I photoshop it in...?)

The next day I queued up a promising recipe for Linguine with Cauliflower Pesto.  Although basil pesto is old hat, and it seems like cauliflower is ubiquitous, showing up roasted in recipes and restaurants, this recipe was unusual – the cauliflower is uncooked, whirled up in a food processor together with sundried tomatoes, capers, garlic and Parmesan cheese.  Served over imported Italian pasta cooked al dente, it was without question a weeknight winner.  Bright flavors, easy to make, healthful, and quick:  great job, Deb – points for originality, too. 
Roasted butternut squash
This galette was great looking and tasting.

The next days brought forecasts of a snowstorm, so I stocked up on ingredients and made several Smitten recipes.  First up was the Butternut Squash and Caramelized Onion Galette.  This recipe had a lot going for it:  healthful roasted veggies, a  fun technique (free form pastry shell!),  easy prep, impressive enough for guests,  and a generous quantity (two large tarts!) for serving and leftovers.

The result –a home run. Perelman really knows her pastry, this dough was easy to work, and was flaky and sturdy enough to stand up to the veggies, and made a beautiful presentation..  Bravo! This recipe, (see below), though not difficult, does require some time in the kitchen.
Mushroom tart:  hearty and delicate at the same time.

That same day, I prebaked the crust for the Wild Mushroom Tart.  The next day I made the filling, adding reconstituted dried porcini mushrooms from the Griggstown Farm Market for a flavor boost (ok, true confession - I didn’t buy enough fresh mushrooms).  The sturdy cornmeal crust was a good foil for the deep flavors of the mushrooms and gruyere– yet another winner.

That night I had a full house coming home from snowboarding, so I up baked up the Mushroom Tart, reheated the second Butternut Squash Tart, and cooked up some of the Mustard Milanese with an Arugula Fennel Salad

The Mustard Milanese was a riff on good old homemade breaded chicken, with mustard, garlic, oregano and lemon zest added to the egg mixture to jazz it up, and topped with a flounce of bitter greens dressed with a mustard vinaigrette.  This dish was a pleasing foil for the richness of the tarts. I would definitely make this again, and you wouldn't even need a recipe - just add those extras to your basic breading routine.
Prepping raspberry rugelach - oddly, looks like pizza!
Finished product - not looking, or tasting, at all like pizza!

For dessert, I served coffee and  Deb’s Chocolate Raspberry Rugelach that I had baked in the afternoon (it was a really snowy day!).  I wanted to love these:  cream cheese pastries filled with all things good - raspberry jam, chocolate chips, walnuts and cinnamon. Just for comparison purposes, I filled half of the dough with the mix from Ina Garten’s Rugelach from the Barefoot Contessa’s Parties cookbook, which is apricot jam, raisins, walnuts, brown sugar and cinnamon, and I'm sorry, Deb, but I like Ina's mixture better.  The doughs are nearly identical, (and in fact Perelman credits Garten in her intro), but I do prefer the smaller rugelach as instructed from Deb's recipe.

Butternut Squash and Caramelized Onion Galette 
adapted from The Smitten Kitchen

Pastry
2 1/2 cups all purpose flour
1/2 teaspoon table salt
2 sticks (16 Tablespoons) cold unsalted butter, cut into cubes
1/2 cup sour cream
1 Tablespoon apple cider vinegar
1/3 cup ice water

Whirl together the flour and salt in a food processor.  Add the butter and process until crumbs form.  Mix the liquid ingredients together in a bowl.  With the machine running, add the liquids to the processor until a ball of dough forms.  Cut in half.  Pat into two balls, cover with plastic wrap, and let rest in fridge for 1 hour or up to 2 days.

Filling
2 small or 1 large butternut squash ( about 2 1/2 pounds)
3 Tablespoons olive oil, divided
1 1/2 teaspoons table salt, divided
freshly ground black pepper
1 Tablespoon unsalted butter
2 large sweet onions, Spanish or Vidalia, halved, sliced thinly in half circles
1/4 teaspoon sugar
1/4 teaspoon cayenne pepper
2 cups (6.5 oz.) fontina cheese, grated 
1 teaspoon fresh thyme, chopped OR 1/2 teaspoon dried thyme
1 egg yolk beaten with 1 teaspoon water for glaze

Preheat oven to 400.  Peel the squash, halve and discard seeds.  Cut into 1/2 dice.  Line rimmed baking sheet with foil. Toss the squash cubes with 2 tablespoons of the olive oil, 1/2 teaspoon of the salt and some fresh ground pepper.  Roast for 30 minutes.

 Melt the butter in a large heavy frying pan together with the remaining tablespoon of olive oil.  Add the onions,  sprinkle with the sugar and remaining 1 teaspoon of salt and cook over medium low heat for 25 minutes, or until soft and tender.  Sprinkle with the cayenne.

Toss the caramelized onions, cheese and thyme over the squash cubes and mix.

On a floured piece of parchment paper, roll out one dough into an 11-inch round.  Top with half the squash mixture.  Fold up 2 inches of the dough and pleat to form a 9 inch circle.  Carefully place on baking sheet. Brush with the egg wash.  Repeat with second dough ball and the rest of the filling.

Bake for 30 to 40 minutes until beautifully golden brown.  Let stand for 5 minutes, and serve hot, warm or at room temp.

I have to admit, I made a bunch more recipes from the Smitten Kitchen:  like I said, this book really honed in on my cooking style, will report back on more recipes from Deb Perelman next time on this blog!

Diane Whitman
Reference Librarian
Smitten with Cooking and Books


Sunday, February 24, 2013

The Barefoot Contessa at My House


Can you have your cake and eat it too?  Yes, I think so.  Here at the Library I oversee the cookbook collection, and then sometimes get to bake from some of those selfsame books for our staff meetings.   I don't have to personally buy the books, but you and I get to use them whenever we want.

I’ve been cooking and baking from Ina Garten’s new Barefoot Contessa book, Foolproof:  Recipes You Can Trust, and every recipe is, in fact, delicious.  But you can’t eat from these recipes every day.  Too rich!  Too fattening!  And sometimes too expensive, too.

(Shrimp) Mac and Cheese
This book has three recipes for lobster, and I don’t know about you, but that is a special occasion recipe for me. I made the Lobster Mac and Cheese and substituted shrimp for a more affordable option.  It was outrageously rich, so full of cheese that you could only eat a small portion, but I loved every bite. 

LOL - who cut a piece out of the middle?
Then I baked Chocolate Chip Blondies – again, very chocolately, buttery and delicious – I put the leftovers in the freezer so I wouldn’t be tempted to eat them.  I have to confess sneaking one to savor – still frozen - after dinner each evening in front of the telly.


Before and...
...after.
My husband requested carrot cake for his birthday in December, but that just did not happen.  Birthdays near the holidays should just not be allowed – too much else goes on!  But I did make Ina’s Carrot Cake with Ginger Frosting for Superbowl for him.  You really cannot beat Ina’s baking recipes, they are just uniformly superlative versions of the tried and true.

The German Chocolate Cupcakes were wonderfully balanced with a tangy sour cream buttermilk cocoa cake and thick sweet coconut pecan frosting on top.  But again, very indulgent and filling.

So pretty!
For Valentine’s Day I baked the shortbread based Raspberry Crumble Bars, deep red and beautiful and seductively delicious.  Help!  My diet is shot to pieces.  I have to stop baking from this book!

This morning, before work, I rolled out the refrigerated dough I had made yesterday for the French Apple Tart from Ina’s Back to Basics Cookbook.  Slicing up Granny Smith apples and sprinkling them with sugar and butter, and then glazing the tart after baking with pear jam, this was a less crazily sinful dessert than the four from Foolproof, but equally delicious.

All of the Barefoot Contessa’s recipes are outstanding not only because of their ease of preparation, but because of their quality and simplicity.  The ingredients are few and easy to find, the directions are straightforward, and the results are consistently wonderful.

Easier than it looks: crisp flaky pastry topped with sweet tart apples.
French Apple Tart
Adapted from Ina Garten’s Back to Basics

2 cups all purpose flour
1 Tablespoon white sugar
½ teaspoon kosher salt
1 ½ sticks (12 Tablespoons) cold unsalted butter, cut into small cubes
½ cup ice water
4 Granny Smith apples, peeled
½ cup white sugar
½ stick (4 Tablespoons) cold unsalted butter
½ cup apricot or pear jam
1 Tablespoon Calvados, Triple Sec or Grand Marnier

Preheat the oven to 400 degrees.

Whirl the flour, sugar and salt in a food processor.  Add the cubed butter, and process until the butter is mixed up into uniform crumbs.  Add the ice water and process 10 or 12 times until just starting to come together in  a ball.  Form into a disc, wrap in plastic wrap and a baggie, and pop in fridge for 1 hour or up to 2 days.

On a floured surface, roll out dough into a 10 x 12 inch rectangle.  Place on a parchment lined sheet pan with sides. 

Cut each apple in half, and with a melon baller, cut out the cores.  Slice each half into ¼ inch thick slices.  Layer the slices diagonally across the dough in rows.  Sprinkle with the sugar.  Dot with small cubes of butter.  Bake in the oven 45 minutes to one hour, until the pastry and some of the apples are golden brown.  You will know it’s done by the lovely smell of the pastry.  Some of the sugar and apple juices will have run off the tart and turned black in the pan.  This is as it should be – don’t panic.

Loosen the tart from the blackend parchment and slide the whole thing off onto a clean sheet of parchment paper and then put the tart with the clean parchment back onto the warm pan.  Let cool 10 minutes. 

Add the liquor to the jam and heat up gently in microwave.  Brush the mixture all over the apples and pastry so that it is shiny and beautiful.  Serve warm or at room temperature.
+++++++++++++++++++++

Cut into squares and pretend you’re in Paris!  The diet? – you can diet tomorrow.

Diane Whitman
Reference Librarian
Baker, Frustrated Dieter


Friday, February 1, 2013

Superbowl/"Slow Cooker Revolution"

Pulled Pork and Pickles (carrot slaw not required)


Plan Ahead for Superbowl – Slow Cooker Revolution

Have you heard the saying there are no bad cooks, just bad recipes?  Here’s a great one to add to your repertoire:  Beginner’s Pulled Pork. 

This book, the Slow Cooker Revolution, a product of the America’s Test Kitchen juggernaut, aims to take old recipes and bring them up to the higher standards of today’s discriminating diner.  As such, some of the recipes ask you to sauté or finish in the oven or broiler in order to get a better result.  This recipe, however, is blissfully simple.  Prepare a spice rub for the pork, pop in the fridge overnight, put in slow cooker, cook all day, shred a little – Done! 

The results are magnificent- the meat itself is meltingly tender, a little bit crispy about the edges, with a tangy, gently spicy sauce.  Although the time to prepare is short, the time to cook is long, so you must plan ahead. 

Once prepared, the pulled pork will sit happily in the slow cooker and be ready for hungry guests to make their own sandwiches any time, so that you can enjoy the Superbowl game – and/or the commercials! as you prefer.

Serve with pickle chips over soft rolls.  The usual accompaniments are cole slaw and extra barbecue sauce, but with a recipe this perfect, are entirely optional.  This can be the main course on soft sandwich rolls for 10 people, or when you’ve got a lot of other courses,  serve on those ubiquitous mini slider rolls for a great little appetizer for 20. 

When people say I’m a good cook,  I think, well, if you made these recipes, you would be too!  After a lifetime of trying new recipes, I think I can discern a good recipe from a bad one, but finding a great one among the good is a matter of trial and error. 

Here is one to definitely hold onto.  Proof:  my son said the other night after dinner - Mom, you can make this once a week! 

Perfect for a cold winter’s day staying in and watching the football game, this would also not be out of place at a summer barbecue. By the way, this reheats well, in case you really want to plan ahead, or in the lucky event you have leftovers!

Beginner’s Pulled Pork
Adapted from America’s Test Kitchen,  Slow Cooker Revolution

1/3 cup packed brown sugar
1/3 cup sweet paprika
1 rounded Tablespoon garlic powder
1 rounded Tablespoon onion powder
1 rounded Tablespoon ground cumin
1  ½ teaspoons cayenne (red) pepper
3 teaspoons Diamond kosher salt, or 1 ½ teaspoons regular table salt
freshly ground black pepper
2 pieces boneless pork butt roast, 3 lbs each
1 ¼ cups barbecue sauce

Soft Rolls
Pickle chips
Optional:  cole slaw, additional barbecue sauce

Mix together all the dry ingredients in a large bowl.  Cut up the pork roasts each into 3 pieces, cutting off and discarding any large pockets of fat.  Put the pork pieces into the bowl, and press the spice mixture into every surface of the pork, using all of it.  Wrap each piece in plastic wrap, and put in the fridge for 8 to 24 hours. 

Put the unwrapped pork pieces in a large oval slow cooker.  Distribute the barbecue sauce over all.  Cover and cook on high for 5 – 7 hours, or on low for 9 – 11 hours. 

When fork tender, shut off the heat, take out the pork onto a cutting board and pull or cut into large bite sized pieces.  Don’t overdo as it will further fall apart when mixed back into the sauce.  Discard any large pieces of fat or gristle. 

Defat the sauce by skimming off and discarding any clear pools of fat from the top of the sauce with a large flat spoon.  Add the pork back into the sauce.  Stir gently and turn the crock pot to the “Warm” setting. 

Serve over soft rolls with pickles; and with cole slaw and extra sauce if you like that sort of thing. 

Diane Whitman
Reference Librarian
Not Cooking Light at the Moment